Save
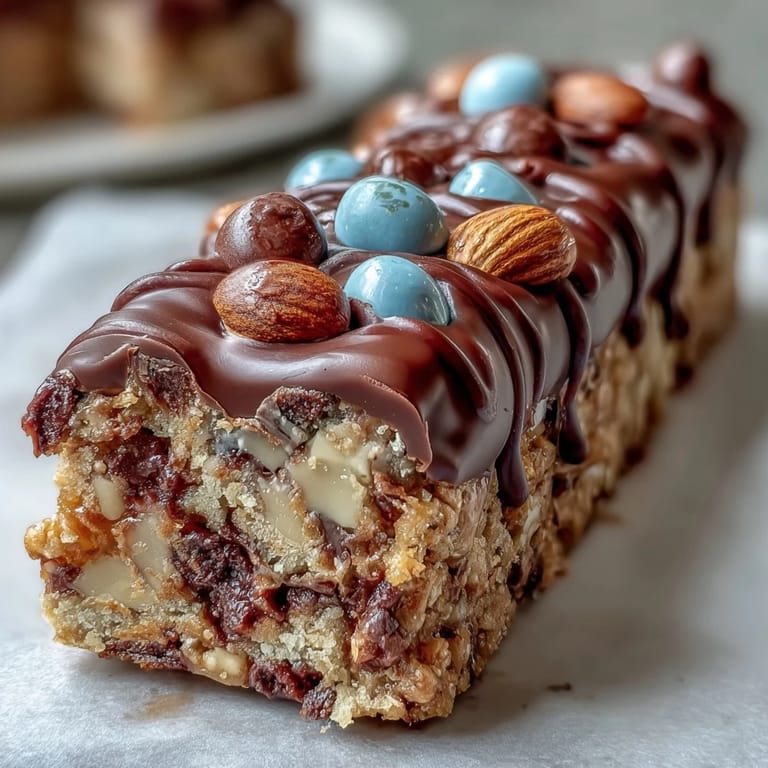
Save My cousin called me three weeks before graduation asking if I could make something special for her party—something that would let her friends know this moment mattered. I found myself in the kitchen on a random Tuesday afternoon, thinking about how desserts have this quiet power to turn celebrations into memories. These cookie bars came together almost by accident, but the moment I drizzled that white chocolate across the top and watched it catch the light, I knew they were exactly what the day needed.
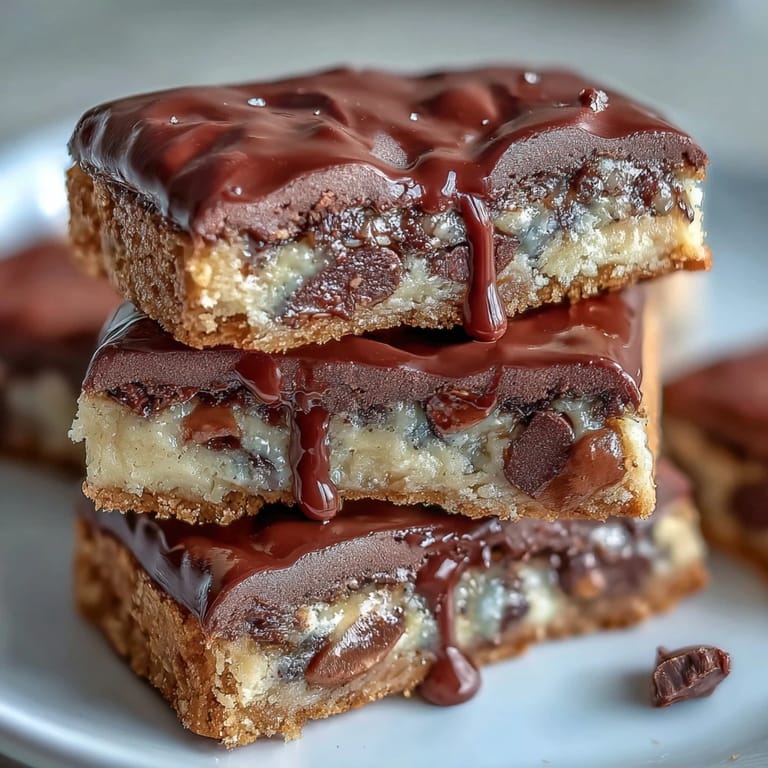
What I didn't expect was how the white chocolate drizzle would make people pause before eating—like they wanted to admire them first. My cousin's friends were taking photos, asking for the recipe, and I realized these weren't just bars; they'd become part of the day's story. That's when I understood why baking for occasions matters so much more than baking for yourself.
Ingredients
- All-purpose flour (2 1/4 cups): The foundation that keeps everything tender without being dense; I've learned to spoon and level rather than scoop directly to avoid packing it in.
- Baking soda (1 tsp): This is your leavening agent, and it's crucial for that slightly cakey-chewy texture that makes these bars different from regular cookies.
- Salt (1/2 tsp): Never skip this; it's the quiet ingredient that makes the chocolate taste richer and less one-note.
- Unsalted butter, melted and cooled (1 cup): Melting it first changes the whole structure—you get a more cake-like crumb instead of crispy cookie texture, which is exactly what we want here.
- Brown sugar (1 cup packed) and granulated sugar (1/2 cup): The brown sugar brings moisture and chewiness, while the granulated sugar helps with structure; together they're what makes these bars stay soft for days.
- Eggs (2 large): These bind everything and add richness; make sure they're at room temperature or your dough will feel gritty.
- Vanilla extract (2 tsp): This little bit of vanilla makes people say 'something tastes amazing' without being able to name it.
- Semi-sweet chocolate chips (1 cup): Semi-sweet gives you that balance between bittersweet and sweet that appeals to most people at a party.
- Colored candy-coated chocolates (1/2 cup): This is where you personalize them—grab the school colors, and suddenly they go from generic to 'wait, did you make these specifically for today?'
- White chocolate, chopped (4 oz): The drizzle is the showstopper, so don't cheap out here; good white chocolate melts smoothly instead of seizing.
- Vegetable oil (1 tsp): This prevents the white chocolate from getting thick and clumpy after melting—a small amount makes it pourable and elegant.
- Colored sprinkles (optional): These are purely for celebration, so use them if the mood strikes.
Tired of Takeout? 🥡
Get 10 meals you can make faster than delivery arrives. Seriously.
One email. No spam. Unsubscribe anytime.
Instructions
- Prep your pan:
- Line your 9x13-inch pan with parchment paper and make sure the edges hang over the sides—this is how you'll lift the whole thing out cleanly later without any crumbling or breaking.
- Mix your dry team:
- Whisk flour, baking soda, and salt in a medium bowl and set it aside so it's ready when you need it.
- Cream your wet ingredients:
- In a large bowl, whisk the melted butter with both sugars until it looks smooth and combined, then add eggs and vanilla one at a time, stirring until everything comes together into one cohesive mixture.
- Bring it together gently:
- Fold the dry ingredients into the wet mixture slowly, stirring just until you don't see flour streaks anymore—overmixing toughens these bars, and nobody wants that.
- Add the celebration:
- Stir in your chocolate chips and colored candies, making sure they're distributed so every bite gets some of each.
- Spread into the pan:
- Pour the dough into your prepared pan and smooth it out evenly with a spatula so it bakes uniformly and looks intentional.
- Bake until golden:
- Bake at 350°F for 23 to 25 minutes, watching for light golden edges—a toothpick in the center should come out mostly clean with a few moist crumbs, not wet batter.
- Cool completely:
- Let these rest on a wire rack in the pan until they're completely cool; this is non-negotiable because warm bars will fall apart when you try to cut them.
- Melt your white chocolate:
- Microwave the white chocolate with oil in 20-second bursts, stirring between each one to prevent seizing—patience here makes the difference between silky drizzle and grainy mess.
- Make it pretty:
- Drizzle the melted white chocolate over the cooled bars using a spoon or piping bag, then add sprinkles if you're feeling festive.
- Set the drizzle:
- Let everything sit for 15 to 20 minutes so the white chocolate hardens before you cut and serve.
- Cut and serve:
- Use the parchment paper overhang to lift the whole slab out, then cut into 16 squares—a sharp knife dipped in warm water makes cleaner cuts.
 Save
Save The morning after the party, my cousin texted me a photo of her friends still talking about these bars. She said one of them actually asked to bring them to a potluck the following weekend, which meant they'd become more than a graduation treat—they'd become something people actually wanted to make.
Why These Bars Win Every Time
There's something about a bar cookie that feels more intentional than a sheet of individual cookies. You're not trying to portion perfectly round dough into cookies; you're just spreading batter in a pan and letting the oven do the heavy lifting. Bar cookies also have this forgiving quality where slightly underbaked centers stay chewy while the edges crisp up, giving you multiple textures in one bite.
The White Chocolate Drizzle Moment
This is where the bars transform from good to show-stopping. The white chocolate isn't just flavor—it's visual drama that makes people think you spent way more time on these than you actually did. I learned the hard way that room-temperature chocolate chips don't melt as smoothly as chunks, and the oil really does matter; without it, you end up with a thick, lumpy consistency that won't drizzle properly.
Customizing for Your Celebration
The beauty of this recipe is how personal it becomes with one small choice: the colored candies. I've made these with school colors, team colors, and even wedding colors, and each version feels completely different even though the base is identical. The sprinkles are optional, but they're where you get to play—use what matches your moment, or leave them off for a more sophisticated look.
- Sort your colored candies before mixing if you want to ensure even distribution throughout the dough.
- If you can't find the exact colors you need, mix two similar shades together to create something close.
- Keep sprinkles in an airtight container because humidity will make them stick together and become impossible to distribute.
 Save
Save These bars have a way of making ordinary moments feel ceremonial. Whether it's graduation, promotion, or just Thursday, they remind us that celebrating doesn't have to be complicated—it just has to come from a good place.
Recipe FAQs
- → What makes these bars chewy?
The combination of melted butter and both brown and granulated sugars creates a moist, tender texture that enhances chewiness.
- → Can I substitute other chocolates?
Yes, dark or milk chocolate chips can be used instead of semi-sweet for varying flavor profiles.
- → How do I achieve the white chocolate drizzle?
Melt white chocolate with a small amount of vegetable oil, then drizzle over cooled bars for a smooth, elegant finish.
- → What is the best way to store the bars?
Store bars in an airtight container at room temperature for up to four days to maintain freshness.
- → Can I customize colors?
Absolutely, use candy-coated chocolates and sprinkles in colors to match themes or celebrations.